Fun with memtest86+ and PXE

Last weekend I had the pleasure to equip my brother’s computer with a new 4GB RAM module. Just out of curiosity I thought I would use this opportunity to test the rarely-used PXE-boot installation, which already served memtest86+ v4.20.

As you might have guessed, I probably would not be writing this blog post if it would have went through flawlessly ;) In other words the test failed and a journey of debugging several (unrelated) problems began.

The first thing I wanted to see is whether memtest86+ in general works. Hence, I immediately rebooted my Lenovo T440s in order to see that PXE-boot would not work at all. Fiddling around with the dnsmasq configuration I tried to make PXE aware of UEFI systems by adding the following

pxe-service=x86-64_EFI,EFI,efi/syslinux.efi,1.1.1.1
pxe-service=x86PC,Standard,pxelinux,1.1.1.1

where 1.1.1.1 of course stands for your tftp-server’s IP. Unfortunately this did not bring the success. It shall be noted that the tftp-server has to serve two files, once pxelinux.0 for the classical BIOS boot process and once syslinux.efi.0 (the 0 is automatically appended by dnsmasq). According to the syslinux documentation it is advisable to create two separate directories for the binaries as they both come with their own set of *.c32 files. As all this did not bring me closer to a working UEFI-PXE-boot setup I dismissed this plan and forced my notebook to boot in BIOS-mode.

Falling back to the BIOS-boot PXE worked as expected (Thinkpad bug?), but memtest86+ only showed a blue screen with a few pieces of information. Given the age of the initial PXE-configuration I thought that updating memtest86+ would be a good idea and quickly fetched the latest sources of version 5.01. Building was not a problem in a standard linux environment, although forerunners of immature code were already visible when make tried to install memtest86+ via scp to a hard-coded IP when executed with the target “all”. After removing the .bin prefix from the memtest executable it almost worked, but crashed immediately after starting testing. Having noticed that the makefile was already in a bad shape I should have come to this conclusion earlier, but after some time I started searching the databases of linux distributions which quite often ship patches for (almost) unmaintained software. And indeed, e.g., Fedora offers a set of patches that fix these problems. Applying the patches and deploying the new memtest then finally gave the first positive result of that day: a working memtest86+ 5.01 on my T440s :)

Back to the original problem, the said 4GB module, which was suspected to be faulty. I was immanently disillusioned that the failure was not due to memtest86+. In hindsight, I have to agree that this was a bit optimistic. Therefore, I bisected the problem and noticed that it was not even specific to that particular module. Realizing that the said mainboard (Asus M4A89GTD PRO) was a piece of hardware with advertised overclocking capabilities, the next step was to look for a smoking gun in that direction. And indeed, I got suspicious about the DDR3-RAM operating at 640 MHz instead of supported 666 MHz and a voltage slightly above 1.5V. A BIOS update then finally turned things to the good (maybe it even just resetted to the default values) and memtest86+ passed. The frequency is still reported to be around 640 MHz, but now it is at least working.

Thoughts on Server to Server Mail Encryption with Postfix and TLS

Inspired by the recent “E-Mail made in Germany”-initiative I had a look into how server to server encryption looks like in my postfix configuration. The latter is usually implemented using TLS and has been supported by postfix since version 2.2. Now, this was not the first time I had looked into the TLS configuration of postfix, since a while ago I had already managed to add my certificates to the postfix configuration

smtpd_tls_cert_file = /path/to/cert.pem
smtpd_tls_key_file = $smtpd_tls_cert_file
smtpd_tls_security_level = may

The main rationale behind this was back-then to allow mail clients like e.g. Thunderbird to use TLS/SSL in order to safely connect to the Mail Transfer Agent (MTA) — in our case postfix — such that internal mail would be at least transferred securely. Now, to my surprise I found out that this is already sufficient for other MTAs to send emails to my postfix instance securely, because they are also using the same protocol (SMTP) for the inter-MTA communication as the Thunderbird client does. The only difference is that Thunderbird does another authentication step, which then allows the user to take advantage of the relaying facilities of postfix.

So receiving emails via TLS was already working like a charm and also the corresponding configuration for allowing encrypted send was already present in my configuration

smtp_tls_security_level = may

Now you may ask: How does one notice that it is working? When receiving mails that were transferred over an TLS-encrypted channel one usually sees in the message source a remark like the following one:

Received: from mail.example.com (mail.example.com [1.1.1.1])
	(using TLSv1 with cipher DHE-RSA-AES256-SHA (256/256 bits))
	(No client certificate requested)
	by example2.com (Postfix) with ESMTPS id XXXXXXXXXXX
	for <blubb@example2.com>; Tue, 29 Apr 2014 19:42:40 +0200 (CEST)

Update: As has been pointed out in the comments, one needs to have set smtpd_tls_received_header = yes for this to work.

Unfortunately the mail stored in the “Sent” directory of your mail client does not contain any information on that regard and one has to consult the maillog to see that sending via TLS has happened.

In principle this is already enough to obtain server to server encryption, but it may be not really satisfactory, since it does not really prevent man-in-the-middle attacks. Therefore, I started playing around a bit with the smtp_tls_policy_maps option

smtp_tls_policy_maps = hash:/etc/postfix/tls_policy
smtp_tls_CApath = /path/to/certs/

where the tls_policy file contains for example

t-online.de    secure ciphers=high
gmx.net        secure ciphers=high
freenet.de     secure ciphers=high
web.de         secure ciphers=high

This basically ensures that every mail to the listed domains is only sent encrypted with a high-quality cipher. The four given domain certificates are all (indirectly) signed by the Telekom Root Certificate, which one can e.g. download here and then place in the certs path. It should also be mentioned that after every change to the tls_policy file one should execute

postmap hash:/etc/postfix/tls_policy

and for every change on the certificates

c_rehash /path/to/certs

A more intricate issue I haven’t had the time to look at yet is how to ensure that postfix only receives mail securely from the listed servers. This way one might already come pretty close to what the partners in the “E-Mail made in Germany”-initiative do. In this context I have also been asking myself whether there is a list of participating servers in this program that are using a certificate derived from the Telekom Root CA? Using this list as the tls_policy file one would at least in one direction become a defacto member of the alliance. Sadly, the website of the initiative does not seem to contain any valuable information on that regard.

For everybody else who is planning to fiddle around with the postfix TLS details I can highly recommend the documentation on the postfix webpage.

After playing around with server to server encryption I have to conclude that it is probably a nice feature, but there are still things missing:

  • Is there a way to ensure that outgoing mail is encrypted? I think I read somewhere that Lavabit had such a feature.
  • It is not necessarily user-friendly if you have to dig in the logs/message-source to find out whether the mail was transferred securely.
Currently I think that both issues may be partly due to the deficiencies of the SMTP protocol, since services like Lavabit have been focusing on web apps for a reason, which allow them to interact with the web server using a custom protocol.

At last it is left to say that this is and will never be a substitution for end-to-end encryption but it may at least help a bit e.g. when the web traffic between two servers is routed over a foreign country with extended wire-taping capabilities.

Running a Fujitsu ScanSnap S1500 on a CentOS 6 Machine

Many people who need a duplex ADF scanner come across the Fujitsu ScanSnap S1500 and so did I. After giving it some thought it ended up being my preferable choice, altough the successor ScanSnap iX500 was already available. This decision was mostly due to the fact that there were reports that indicated SANE-support for S1500, which was unclear for the iX500.

My demands on an ADF scanner setup basically were:

  • It should work together with CentOS 6.
  • There should be a one-button setup that saves the scanned A4 pages to a predefined Samba share.
  • Optimally it should autodetect whether it needs to be run in duplex mode.
  • Automatic OCR embedded in the pdf as an optional nice feature.

Regarding the CentOS 6 setup one can say, that the scanner works out of the box. The only minus point is that, as has been indicated here, one has to pass the “-B” option to scanimage in order to fix some I/O errors in case of colored duplex mode.

For the one-button setup I used scanbuttond. There seems to be a “successor” scanbd, but I didn’t get it working. As scanbuttond is not provided in any CentOS repository you have to compile it on your own: I downloaded the latest 0.2.3 version, which apparently does not have support for the ScanSnap S1500 since the project is orphaned. Fortunately the Debian project provides a set of patches, where one of them adds support for the scanner.

So in principle one now could write a working one-button-to-pdf script. The missing part with automatically deciding on whether to scan in duplex mode is more tricky and it ended up with a small script I found here, which does some sort of auto white page removal. At the moment it is a viable solution, though not a very fast one.

The last point with the automatic OCR is still missing since CentOS does not come with any decent OCR in the repositories. In one way or another it will probably be some combination of tesseract / Ocropus / cuneiform with hocr2pdf, but this is still under investigation.

In the end the script that gets called within buttonpressed.sh is the following:

#!/bin/bash
 
CURDIR=`pwd`
TMPDIR=`mktemp -d`
OUT_DIR=/sambashares/
 
cd $TMPDIR
 
echo "Starting Scan:"
echo "=============="
echo ""
 
scanimage -b -B --resolution 150 --batch=scan_%03d.tiff --format=tiff \
	--mode Color --device-name "fujitsu:ScanSnap S1500:111111" \
	-x 210 -y 297 --brightness +10 \
	--page-width 210 --page-height 297 \
	--sleeptimer 1 --source "ADF Duplex"
 
echo ""
echo "Checking for blank pages:"
echo "========================="
echo ""
 
if [ -f "scan_001.tiff" ]; then
 
for i in scan_*.tiff; do
  histogram=`convert "${i}" -threshold 50% -format %c histogram:info:-`
  white=`echo "${histogram}" | grep "white" | sed -n 's/^ *\(.*\):.*$/\1/p'`
  black=`echo "${histogram}" | grep "black" | sed -n 's/^ *\(.*\):.*$/\1/p'`
  blank=`echo "scale=4; ${black}/${white} < 0.005" | bc`
  echo `ls -lisah $i`
  if [ ${blank} -eq "1" ]; then
    echo "${i} seems to be blank - removing it..."
    rm "${i}"
  fi
done
 
OUTPUTNAME=scan_`date +%Y%m%d-%H%M%S`.pdf
 
tiffcp -c lzw scan_*.tiff allscans.tiff
tiff2pdf -z -p A4 allscans.tiff > out.pdf
gs      -q -dNOPAUSE -dBATCH -dSAFER \
        -sDEVICE=pdfwrite \
        -dCompatibilityLevel=1.3 \
        -dPDFSETTINGS=/screen \
        -dEmbedAllFonts=true \
        -dSubsetFonts=true \
        -dColorImageDownsampleType=/Bicubic \
        -dColorImageResolution=300 \
        -dGrayImageDownsampleType=/Bicubic \
        -dGrayImageResolution=300 \
        -dMonoImageDownsampleType=/Bicubic \
        -dMonoImageResolution=300 \
        -sOutputFile=$OUTPUTNAME \
        out.pdf
 
cp $OUTPUTNAME $OUT_DIR/$OUTPUTNAME
 
chown smbuser:smbuser $OUT_DIR/$OUTPUTNAME
 
fi
 
cd $CURDIR
 
rm -rf ${TMPDIR}

Just a few last remarks on the script:

  • You have to get the scaner ID from “scanimage -L” and replace it accordingly in the scanimage call.
  • Using the jpeg compression feature of tiff2pdf gives the picture a red color cast, which I cannot explain so far.
  • In order to achieve a better compression ratio I also added the ghostscript call.
Summing up I’m so far content with the feature the scanner provides and from hardware side there is only the point that it would have been nice to have a second button, e.g. for producing direct copies. Regarding the script there are still things I might want to try, most notably the automatic OCR, but in theory there is also support for color correction in SANE (but this is really low priority).

Fortran for C/C++ Programmers: Part I

Due to my current occupation, which involves numerical computations, I have to deal with Fortran in its different flavors. Since in the past I have almost exclusively programmed C/C++ and never had used Fortan I ran into some nasty bugs, which I want to share, guessing that there are probably more people in the same situation. Most of these bugs are simply because of the fact, that one projects the known C-semantics onto Fortran. Or saying it differently: the bug sits between the keyboard and the chair :)

In this first post I want to start with the following example

subroutine bar()
 
implicit none
 
logical :: foo = .false.
! do other stuff
end subroutine

which is compared to:

subroutine bar()
 
implicit none
 
logical :: foo
foo = .false.
! do other stuff
end subroutine

Looks basically the same. Apparently it is NOT. The problem is that for Fortran every variable which is initialized at declaration is automatically marked saved, which, just to make it clear, corresponds to the static keyword in the C world. To make it even more precise the first example is the same as:

subroutine bar()
 
implicit none
 
logical, save :: foo = .false. ! foo's value is persistent across subroutine calls
! do other stuff
end subroutine

Or the same function in C:

void bar()
{
    static bool foo = false;
    // do other stuff
}

This is just a habit thing, since in C and C++ there is not a problem with initialization at declaration. When I experienced the bug above I luckily had a simple function and a unit test which helped to reveal the bug quite fast. Otherwise one probably could keep staring at code for some time, falsely assuming this part of the code being too simple to fail.

Building a E-350 based NAS

One of the things I wanted to have done for quite some time now was building a NAS from the ground up. Several weeks ago the two year old Buffalo Pro Duo capitulated such that I finally got my chance :) Over the time there have been some things I wanted to try, but which the Buffalo NAS due to several reasons wasn’t able to deliver. So there were certain requirements the new NAS would have to meet:

  • Due to a misconception the Buffalo NAS was accessing the hard disks approximately every 20 seconds, which in the end probably led to the harddisk failure. Hence the new setup should use a SSD for the operating system partition in order to minimize the exposure of the mechanical parts.
  • Although the initial setup will only use two harddisks, I want to have the possibility to expand the RAID5 array in the future.
  • The processor should be powerful enough to handle a software RAID.
After searching a bit I found the following combination appealing, which then also ended up in the NAS
  • Asus E35M1-M with a passively cooled AMD E-350
  • beQuiet Straight Power E9 with 400 Watts
  • Samsung MZ-7PC in the 64 GB configuration
  • 2x Western Digital WD20EARX  with 2TB each
  • 4 GB Corsair PC1333 RAM
  • Xigmatek Midi Tower Asgard

The assembly

The assembly was straightforward although one directly noticed that the Midi Tower is the cheapest link in the chain. The power supply’s radiator cowling was slightly poking out such that it didn’t exactly fit, but it worked somehow.

Software setup

In the beginning I was pondering whether to choose FreeNAS or CentOS. Both are probably good choices, but since I don’t consider ZFS as the holy grail of file systems and I’m a passionate Fedora user the final choice was the CentOS 6.2 minimal spin. One of the main arguments for CentOS compared to other Linux distributions was that it has a long life cycle and ships quite up-to-date packages, although GRUB2 and systemd are for example missing. The kernel is shipped in the version 2.6.32, which is IMHO a bit old, as it turned out it doesn’t support the CPU temperature sensors out of the box (see below).

During installation I only had to deal with a small problem, that the installer wouldn’t want to boot from the UNetbootin-prepared USB stick in the beginning. Finally looking at the ASUS EFI bootmenu unveiled a second entry for the USB stick which choosing did the trick. From there on there were just some minor bumps on the road to a complete NAS:

  • Out of the box CentOS minimal is configured to use NetworkManager, although NetworkManager is not installed. As had been described here one has to edit /etc/sysconfig/network-scripts/ifcfg-eth0 to turn off NM and to enable eth0 on startup.
  • As usually there’s always a point where you start struggling with selinux. In my case this was fixed by calling
    1
    
    chcon -t samba_share_t /path/to/shares

    for the samba share directory and

    1
    
    restorecon -R -v /root/.ssh

    for the newly created ssh directory (otherwise public key authentication won’t work).

  • While doing the Samba setup I searched quite some time for the option probably everybody wants to use in a small home network
    1
    
    map to guest = Bad User

    which, as it says, maps everybody without proper authentication to the guest (normally the user “nobody”).

  • A nice gimmick I wanted to try was AirPrint. I found a script that autogenerates the avahi service files for the installed printers, but as it turned out one also needs to add
    1
    
    ServerAlias *

    to the cups configuration.

  • Unfortunately does the 2.6.32 linux kernel not ship any support for the hardware sensors in the E-350 CPU. So I had to install the kmod-k10temp rpm from ElRepo. The sensor data is then available in the /sys/module/k10temp/drivers/pci:k10temp/0000:00:18.3 directory.

Testing the CPU-Cooling

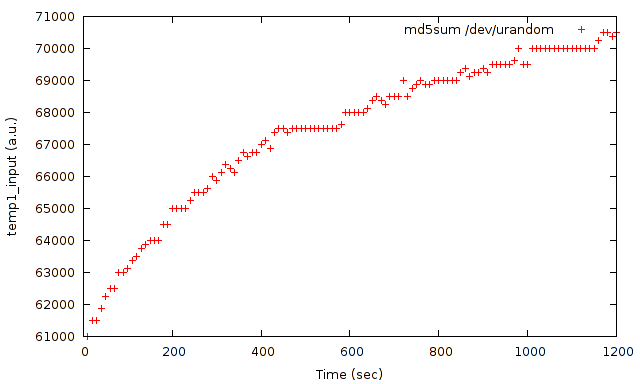
The thing I was most curious about was whether the passively-cooled CPU would even sustain under full load, since there’s also a PRO Version of the motherboard which is shipped with an additional fan. So I started twice

1
md5sum /dev/urandom

and monitored the CPU temperature over time. The result can be seen below:

The first plot on a physicist’s blog and it doesn’t even have error bars, shame on me ;) It’s difficult to interpret these numbers as in the k10temp documentation is stressed, that temp1_input is given in almost arbitrary units. But k10temp gives one also the following values in the same units

1
temp1_max = 70000, temp1_crit = 100000, temp1_crit_hyst = 97000

According to the k10temp documentation the CPU is throttled to prevent damage once temp1_crit(_hyst) is reached, so operating a passively cooled E-350 in a NAS should be safe even under occasional load. At first I was a bit irritated of the temp1_max value, but apparently it seems to be just a dummy value (see k10temp source).

Conclusion

So far I’m quite content with the NAS, but there are still some benchmarks that I want to run and some options (e.g. spin-down time of the harddisks) which I want to tweak. Hopefully I’ll find some time to blog about it.

That’s it :)

Of painting less

It has passed quite some time since my last blog post about optimizing KWin’s performance, so I felt the need to write a new one :) In the meantime KDE SC 4.8 including KWin 4.8 got released with all the features I had described in that blog post, but there are already new optimizations that have landed in the kde-workspace git repository, which I just want to explain shortly:

  • The first thing isn’t even new, it is already part of KWin 4.8 :) It is a window property called _NET_WM_OPAQUE_REGION that allows an application with a translucent window to give the window manager a hint which parts of a window are still opaque. Hence KWin has more room for optimizations. It is part of the ewmh spec and I hope that more applications/styles will adopt it. So far the only style, that I’m aware of, which is using this feature is oxygen-transparent.
  • I ported the TaskbarThumbnail, SlidingPopups and WobblyWindows effects to the faster code path that uses paintSimpleScreen. This was a long overdue step, which I really would like to have had in 4.8, but it needed some nontrivial changes to paintSimpleScreen. The actual painting is now done only in one pass instead of two, such that more window-transforming effects can be ported to utilize this function.
  • In the spirit of optimizing paintSimpleScreen I also tried to cut down the number of all OpenGL calls. E.g. now KWin does no longer emit a single OpenGL call if the damaged part of the window is fully occluded. To achieve this I used apitrace, which by the way really rocks.
  • These days there has finally been added faster repaint support for move/resize events in combination with oxygen-transparent. Before this patch KWin always had to invalidate the blur texture cache of a window if it overlapped with the area of a moving window, although the blurry window might have been below the moving one, which is usually the case. For several blurry windows stacked on top of each other, this meant that moving a window could considerably slow down KWin. At the moment I’m working on porting several window-transforming effects (e.g. WobblyWindows) to use this new and faster method.
That’s it for now :) For all the other cool new features in KWin I may refer you to Martin’s blog.

WordPress and hphp: Part II

In my last post I had described how to circumvent some issues when compiling Wordpess 3.2.1 with Hiphop-Php. Unfortunately it came up that the compiled binary suffered from a memleak which took me quite some time to find and fix.

As it turned out hphp has a regular expression cache which caches every regular expression indefinitely such that clearing the cache is only possible if you shutdown the application. In principle this is not a problem for an application which has only a limited set of static regular expression patterns (which should be the case for most of the applications). But once the regex pattern becomes a runtime option the cache fails. This seems to be due to the fact that hphp compares cacheentries according to their regex-pattern hash and there is no guarantee that two equal dynamically allocated regex-pattern strings have the same hash. In the specific case of WordPress you have the runtime option to specify the date format which is mangled into a regex pattern somewhere inside the mysql2date function.

The obvious workaround is to limit the number of cacheentries. The specific commit can be found in my hiphop-php branch, which as the title says makes the PCRECache a least recently used cache. I strongly recommend those running a hphp-compiled WordPress to apply that patch. Feedback is as always welcome :)

Compiling WordPress with Hiphop-Php

This is a project that I started last weekend and where I just want to share some of the insights I had, because compiling with Hiphop-Php (hphp) is not as straightforward as compiling an application with gcc or clang ;)

The first thing you realize when looking at the github hiphop-php page is that it has a long list of dependencies, which I wanted to reduce to a minimum. So I ended up forking hiphop-php and adjusting it to my needs: it should work with a minimal set of dependencies and it should be easy to deploy. At the moment my list of dependencies, that are not provided by CentOS 5, is down to libevent, curl, oniguruma and libmemcached. I had to sacrifice the ICU SpoofChecker, but as it isn’t used by WordPress this shouldn’t be a problem. Additionally I’ve chosen to use the static library versions of these dependencies, because I compile this stuff in a separate virtual machine and I don’t want to mess with rpath issues.

Once when you get to the point where you have a working hphp and try to compile WordPress 3.2.1 you will notice that the function SpellChecker::loopback won’t compile. Introducing a temporary variable fixes the issue:

$ret = func_get_args();
return $ret;

Now you are at the point where you can compile WordPress :) …., but it won’t work :D Some of the SQL queries will fail and the best workaround I could come up with is to set

$q['suppress_filters'] = true;

in query.php.

So was this all worth it? Given the current viewership numbers of this blog I wouldn’t say so, but it was quite funny :D According to apachebench this blog is now capable to serve 50 request per second instead of 10.

At the end some last remarks about hphp:

  • Using the mentioned approach generates huge binaries, so a normal WordPress blog needs about 40-50 MB. The problem seems to be that some files, especially the dynamic_*.cpp ones, accumulate the references to symbols in other files. This prevents the linker from stripping the unneeded sections, because the compiler by default puts all functions of the same source file into one section. There are compiler flags, namely “-ffunction-section” and “-fdata-section” in combination with the linker flag “-Wl,–gc-sections”, which can change this behavior, but so far I didn’t try.
  • The upstream hphp has some issues with the source files not being present at runtime, see this commit.
  • I personally don’t like the idea to have to execute cmake in the root path of hphp :)

Optimizing KWin 4.8

Since KDE SC is actually in feature freeze I thought it might be a good idea to blog about my contributions to KWin 4.8. As some of you may have noticed it is also my first post to this blog and especially to planetKDE :)

Many of my commits have been optimizing the existing code base, so despite the hopefully increased performance you should not see any changes. Or in other words: this will be a more technical blog post.

Occlusion Culling in KWin

All this started with Martin pointing me to the fact that kwin initially did not process XDamage events window specific, as they are reported by the X server, but rather gathering all events and then updating the corresponding screen region. This could lead to the strange behavior that although your current virtual desktop was empty kwin was busy repainting the background again and again, just because on another virtual desktop your videoplayer was running maximized. Clearly this is a waste of resources.

So the solution was to process the events on a per window basis, which required to change two of the main functions in KWin: paintGenericScreen and paintSimpleScreen. Now one has to know that if the screen gets repainted either one of those functions gets called no matter whether you use OpenGL or XRender for compositing. As a nice side effect this also means that the optimizations described here equally apply to the XRender backend.

  • paintGenericScreen is the general implementation which just draws the window stack bottom to top, doing the preprocessing and the rendering in the same pass. This has the advantage that you can draw every scene, but with the cost that it is not really optimized. Especially fullscreen effects use this code path.
  • paintSimpleScreen is restricted to cases where no window is transformed by an effect. The actual rendering is done in three passes. The first one is the preprocessing pass, where all effects not only get informed about what will be painted but also have the opportunity to change this data (e.g. making the window transparent). The second pass then starts drawing all the opaque windows top to bottom. At last the third pass paints all the remaining translucent parts bottom to top. The most crucial point here is to do a proper clipping when splitting up the rendering process into two passes.

While changing paintGenericScreen was straightforward by just accumulating the damage bottom to top, changing paintSimpleScreen needed a bit more work because of the aforementioned clipping. More precisely in the top to bottom pass one has to gather all the damaged translucent regions while cutting off all the regions that have already been rendered. The last pass then just has to render the remaining damaged translucent area. Or summarized one can say that kwin now implements some kind of occlusion culling.

Blur effect

Nearly everybody who asks in a KDE related chat, why KWin is performing poorly, gets the recommendation to deactivate the blur effect. The good news is that this should no longer be the case in KWin 4.8 :)

The main reason for the poor performance was that the blur effect requires the windows to be painted bottom to top and as such was limited to the unoptimized paintGenericScreen. So in KWin 4.7 not a single frame is painted with paintSimpleScreen if the blur effect is used. Hence my first objective was to port the blur effect to use paintSimpleScreen. Fortunately kwin allows the effects not only to change the painting region in the preprocessing pass but also the clipping area. This way the blur effect can now mimic the paintGenericScreen behavior and control which regions of the screen get painted bottom to top.

But just porting to paintSimpleScreen still was not that satisfactory, mainly because the blur effect still suffered from something I would call an avalanche effect. This was due to the fact that once the blurry region was damaged we had to repaint the whole region, such that a small damaged region could lead to a big repaint event (e.g. a damaged system tray icon forcing KWin to repaint the entire system tray). KWin now avoids this by buffering the blurred background in a texture, which then gets updated partially.

That’s it. :) Last but not least I want to thank Martin Gräßlin, Fredrik Höglund and Thomas Lübking for fruitful discussions and especially for taking the time to review all these changes.

Just another random blog …..

As the blog name suggests, this blog is about some random thoughts of mine. Given the fact that the entropy of these thoughts wouldn’t justify /dev/random, I found it appropriate to call it “/dev/urandom thoughts”.

Those hoping for random number, encryption or information theoretical related blog posts will probably be disappointed because I’m so far not planing any posts about these topics. The main topics I had in mind while setting up this blog are:

  • KDE, especially kwin, related thoughts
  • maybe some physics
  • All the rest I haven’t thought about yet.

I hope you enjoy reading :)

Regards,

Philipp