One of the things I wanted to have done for quite some time now was building a NAS from the ground up. Several weeks ago the two year old Buffalo Pro Duo capitulated such that I finally got my chance ![]() Over the time there have been some things I wanted to try, but which the Buffalo NAS due to several reasons wasn’t able to deliver. So there were certain requirements the new NAS would have to meet:
Over the time there have been some things I wanted to try, but which the Buffalo NAS due to several reasons wasn’t able to deliver. So there were certain requirements the new NAS would have to meet:
- Due to a misconception the Buffalo NAS was accessing the hard disks approximately every 20 seconds, which in the end probably led to the harddisk failure. Hence the new setup should use a SSD for the operating system partition in order to minimize the exposure of the mechanical parts.
- Although the initial setup will only use two harddisks, I want to have the possibility to expand the RAID5 array in the future.
- The processor should be powerful enough to handle a software RAID.
- Asus E35M1-M with a passively cooled AMD E-350
- beQuiet Straight Power E9 with 400 Watts
- Samsung MZ-7PC in the 64 GB configuration
- 2x Western Digital WD20EARX with 2TB each
- 4 GB Corsair PC1333 RAM
- Xigmatek Midi Tower Asgard
The assembly
The assembly was straightforward although one directly noticed that the Midi Tower is the cheapest link in the chain. The power supply’s radiator cowling was slightly poking out such that it didn’t exactly fit, but it worked somehow.
Software setup
In the beginning I was pondering whether to choose FreeNAS or CentOS. Both are probably good choices, but since I don’t consider ZFS as the holy grail of file systems and I’m a passionate Fedora user the final choice was the CentOS 6.2 minimal spin. One of the main arguments for CentOS compared to other Linux distributions was that it has a long life cycle and ships quite up-to-date packages, although GRUB2 and systemd are for example missing. The kernel is shipped in the version 2.6.32, which is IMHO a bit old, as it turned out it doesn’t support the CPU temperature sensors out of the box (see below).
During installation I only had to deal with a small problem, that the installer wouldn’t want to boot from the UNetbootin-prepared USB stick in the beginning. Finally looking at the ASUS EFI bootmenu unveiled a second entry for the USB stick which choosing did the trick. From there on there were just some minor bumps on the road to a complete NAS:
- Out of the box CentOS minimal is configured to use NetworkManager, although NetworkManager is not installed. As had been described here one has to edit /etc/sysconfig/network-scripts/ifcfg-eth0 to turn off NM and to enable eth0 on startup.
- As usually there’s always a point where you start struggling with selinux. In my case this was fixed by calling
1
chcon -t samba_share_t /path/to/shares
for the samba share directory and
1
restorecon -R -v /root/.ssh
for the newly created ssh directory (otherwise public key authentication won’t work).
- While doing the Samba setup I searched quite some time for the option probably everybody wants to use in a small home network
1
map to guest = Bad User
which, as it says, maps everybody without proper authentication to the guest (normally the user “nobody”).
- A nice gimmick I wanted to try was AirPrint. I found a script that autogenerates the avahi service files for the installed printers, but as it turned out one also needs to add
1
ServerAlias *
to the cups configuration.
- Unfortunately does the 2.6.32 linux kernel not ship any support for the hardware sensors in the E-350 CPU. So I had to install the kmod-k10temp rpm from ElRepo. The sensor data is then available in the /sys/module/k10temp/drivers/pci:k10temp/0000:00:18.3 directory.
Testing the CPU-Cooling
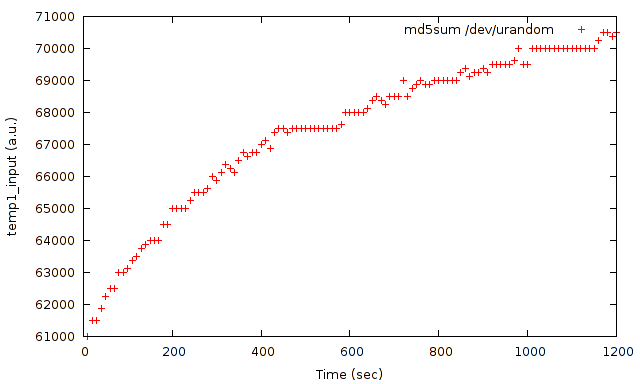
The thing I was most curious about was whether the passively-cooled CPU would even sustain under full load, since there’s also a PRO Version of the motherboard which is shipped with an additional fan. So I started twice
1 | md5sum /dev/urandom |
and monitored the CPU temperature over time. The result can be seen below:
The first plot on a physicist’s blog and it doesn’t even have error bars, shame on me ![]() It’s difficult to interpret these numbers as in the k10temp documentation is stressed, that temp1_input is given in almost arbitrary units. But k10temp gives one also the following values in the same units
It’s difficult to interpret these numbers as in the k10temp documentation is stressed, that temp1_input is given in almost arbitrary units. But k10temp gives one also the following values in the same units
1 | temp1_max = 70000, temp1_crit = 100000, temp1_crit_hyst = 97000 |
According to the k10temp documentation the CPU is throttled to prevent damage once temp1_crit(_hyst) is reached, so operating a passively cooled E-350 in a NAS should be safe even under occasional load. At first I was a bit irritated of the temp1_max value, but apparently it seems to be just a dummy value (see k10temp source).
Conclusion
So far I’m quite content with the NAS, but there are still some benchmarks that I want to run and some options (e.g. spin-down time of the harddisks) which I want to tweak. Hopefully I’ll find some time to blog about it.
That’s it ![]()

